Set up your PisoFi vendor the right way. Learn portal login, default passwords, voucher codes, rates, and admin settings. Full 2026 guide.
PisoFi is a coin-operated WiFi management software built for Raspberry Pi 4B. Operators install it on a small board, connect it to any internet line, and start selling WiFi access by the coin or by the voucher. Customers pay, get online, and the PisoFi portal handles everything in between.
This guide is for operators at every stage. First-time setup, admin login, PisoFi default password, WiFi rate configuration, WiPass voucher codes, remote management, and the full range of PisoFi vendo features are all here, in order.
What Is PisoFi?
PisoFi is software. A lot of people buy a vendo kit and call the whole thing “PisoFi,” but the hardware and the PisoFi software are separate things. The software runs on a Raspberry Pi 4B and manages every part of your hotspot business from one local admin panel.
- Fully offline system, no constant internet required to operate
- Handles up to 40 connected clients depending on your ISP plan and speed
- Works in sari-sari stores, transient houses, waiting areas, condo lobbies, and school zones
- Free 14-day trial with no feature restrictions before you buy the license
Beyond WiFi, the same PisoFi vendo supports eLoading, coin-operated desktop timers for computer shops, and phone charging stations. You are not locked into just one service.
Hardware You Need Before Setup
Get the hardware sorted before you download anything. Wrong components waste more time than a slow internet connection.
| Hardware | What to Know |
|---|---|
| Raspberry Pi 4B | Required. Older Pi models do not run the current PisoFi OS images |
| MicroSD Card | Use SanDisk Ultra. Budget SD cards corrupt faster and will cause random system crashes |
| Coin Acceptor | Must share a common ground with the Raspberry Pi, or you will get ghost credits |
| NodeMCU Firmware | Needed for coin slot reading |
| WiFi Router or Access Point | Any standard unit works |
| Internet Connection | Broadband or LTE SIM |
| PisoFi License | Buy from an official distributor or directly through the PisoFi Facebook page |
The grounding issue trips up more first-time operators than anything else. If your coin slot and your Pi do not share a ground wire, the machine logs phantom coin insertions. One extra wire fixes it completely.
If you are still sourcing a machine or sorting out the paperwork, our guide on how to request a Piso WiFi vendo machine covers the hardware checklist, NTC registration, and coin slot calibration in detail.
PisoFi License: Pricing, Types, and How to Register
The PisoFi license is a lifetime purchase. You pay once, and the machine is yours to run indefinitely. No subscriptions, no renewals.
License pricing in 2026:
- Main vendo license:
₱1,000 - Sub vendo license:
₱300per additional sub vendo - Desktop credits for Piso Net (computer shop mode):
₱300per desktop
The 14-day trial covers everything. If you run a full 14-day test and the machine works for your location, buy the license and register it through the admin panel.
Steps to register your PisoFi license:
- Connect your phone or laptop to the WiFi network named “PisoFi”
- Open a browser and go to
10.0.0.1/admin - Log in using the initial credentials
- A prompt appears saying the device is not yet registered
- Click Register Device
- Sign in to your PisoFi account with your email address and your license key
- Confirm registration, and the system activates
Store your license key somewhere you will not lose it. You need it if you ever transfer the license to a different machine.
How to Install PisoFi Software on Raspberry Pi
Installation is just flashing an image file to the MicroSD card. The whole process takes 15 to 20 minutes.
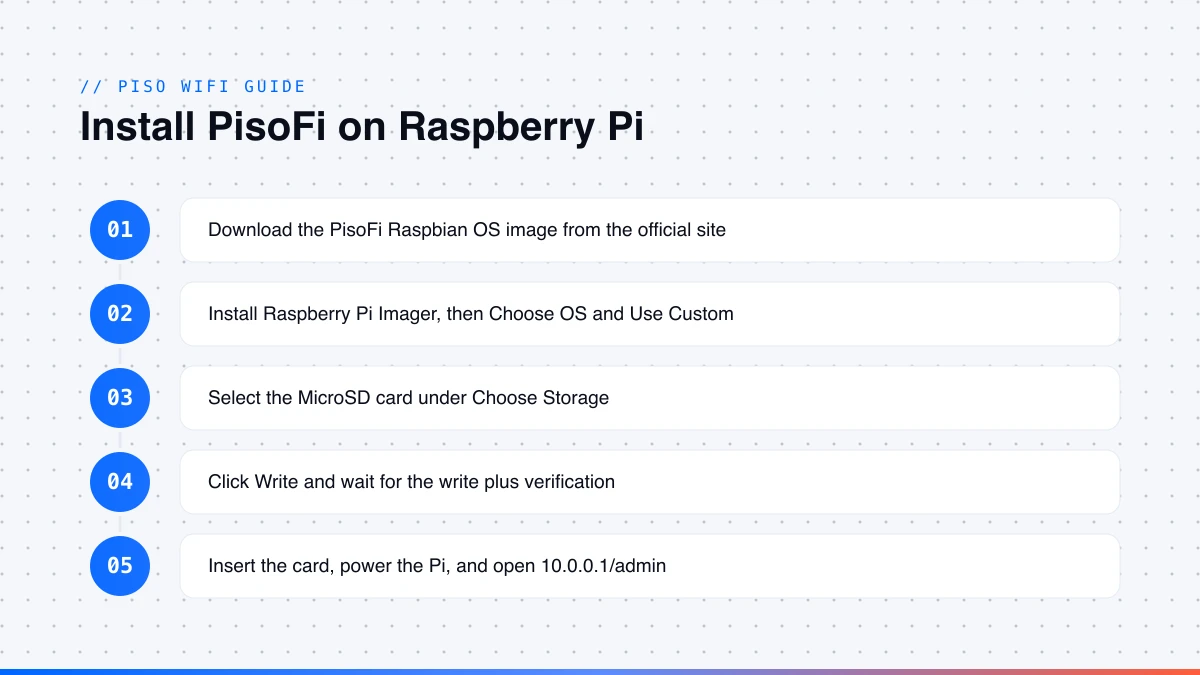
- Download the PisoFi Raspbian OS image from the official PisoFi website
- Download and install Raspberry Pi Imager on your Windows or Mac computer
- Open Raspberry Pi Imager, click Choose OS, select Use Custom, and pick the PisoFi image file you downloaded
- Insert your MicroSD card into an SD card reader and plug it into your computer
- Click Choose Storage and select the MicroSD card. Double-check that you picked the right drive
- Click Write and do not close the program or pull the card out while it is writing. The write plus verification takes a few minutes
- When it says done, safely eject the MicroSD card
- Insert the MicroSD card into the slot on your Raspberry Pi
- Connect the 12V DC barrel jack to the board and flip the power switch on
The Pi boots up, and the PisoFi system loads. This takes about 60 to 90 seconds on first boot.
After that, the Pi broadcasts a WiFi network named “PisoFi”. Connect to it, open 10.0.0.1/admin in Chrome, and complete the initial setup. Change your admin password before you do anything else. The default credentials are public, and anyone on your network can find them.
PisoFi Login: Customer Portal and Admin Portal
The PisoFi portal has two sides that do completely different jobs. Customers use one, operators use the other.
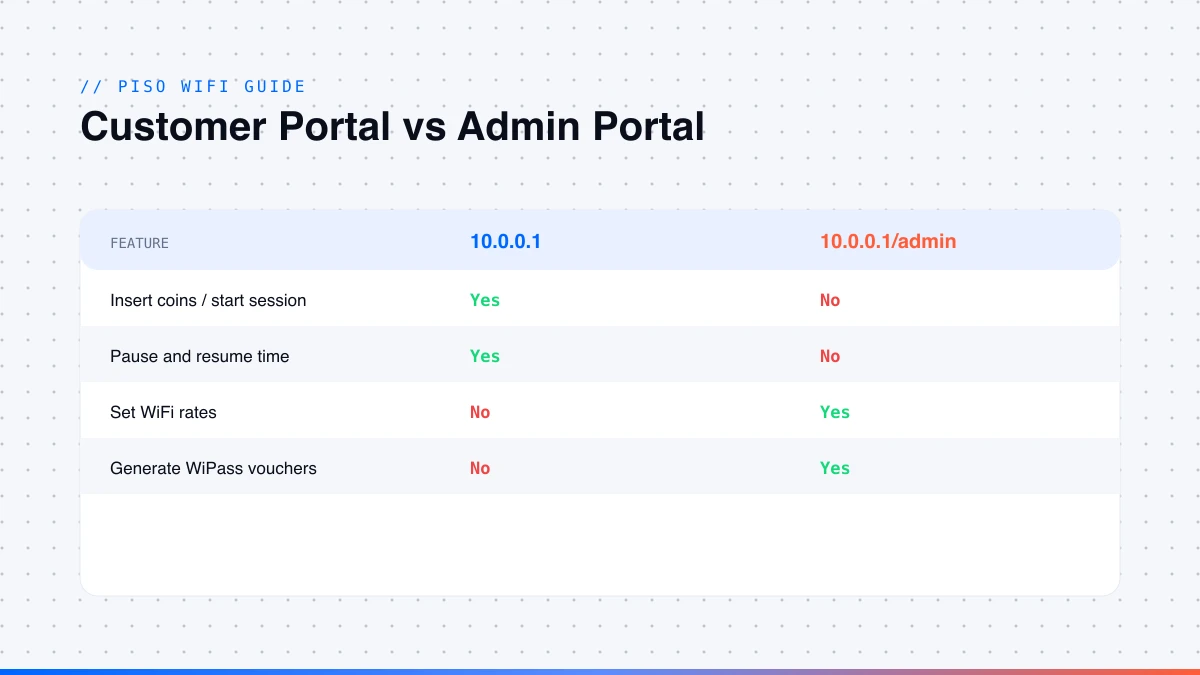
Customer Portal (10.0.0.1)
This is the page customers land on when they connect to your WiFi. It handles coin insertion, session start, and the pause function.
- The customer connects their phone or laptop to your PisoFi WiFi network
- They open a browser and go to
10.0.0.1 - The PisoFi portal page loads automatically
- They click Insert Coin and drop their coin into the vendo slot
- The portal credits the matching session time
- They click Go Online to start browsing
To pause the session, the customer goes back to 10.0.0.1 and clicks Pause. The timer stops. Remaining time is saved for when they come back.
Operator note: The pause feature needs to be enabled on your end first. Go to Admin Portal, then Portal, then WiFi Options, then Time, and turn on “Pause User’s Time When Connected.” You can also set it to pause automatically when the customer’s device disconnects from the network.
For the full pause-and-resume walkthrough across every firmware version — including how it behaves for customers and why the button sometimes goes missing — see the complete Piso WiFi pause time guide.
PisoFi Admin Login (10.0.0.1/admin)
The admin side is where you run everything. Rates, sales data, WiPass vouchers, bandwidth limits, portal design.
Default login credentials:
| Field | Value |
|---|---|
| URL | http://10.0.0.1/admin |
| Username | administrator |
| Password | admin12345 |
After logging in, the PisoFi admin dashboard opens. The main navigation gives you access to user session management, daily sales, WiPass voucher generation, WiFi rate settings, portal customisation, and network configuration.
The 10.0.0.1 gateway is shared by most Piso WiFi firmware, so this panel will feel familiar if you have run other systems — our 10.0.0.1 admin login guide breaks down the same dashboard on LPB and Ado Piso WiFi. If your router or a sub vendo answers on a different gateway instead, the 10.5.50.1 login guide and 20.0.0.1 admin login guide walk through those addresses the same way.
PisoFi Default Password
The PisoFi default password is admin12345, and the username is administrator. These are published on multiple public pages. Anyone sitting in your store and connected to your WiFi can type 10.0.0.1/admin, enter those credentials, and get full control of your machine if you leave them unchanged.
Change the PisoFi admin password on first login:
- Open
10.0.0.1/adminand sign in with the default credentials - Go to Settings, then Admin Account
- Enter the current password in the required field
- Type your new password, make it at least 12 characters, mix letters and numbers, avoid obvious words
- Save the changes
If you forget your new PisoFi admin password, the only recovery option is through the Raspberry Pi terminal. That process takes time and requires some technical steps. Writing your password down somewhere secure is the smarter move.
How to Set Up WiFi Rates
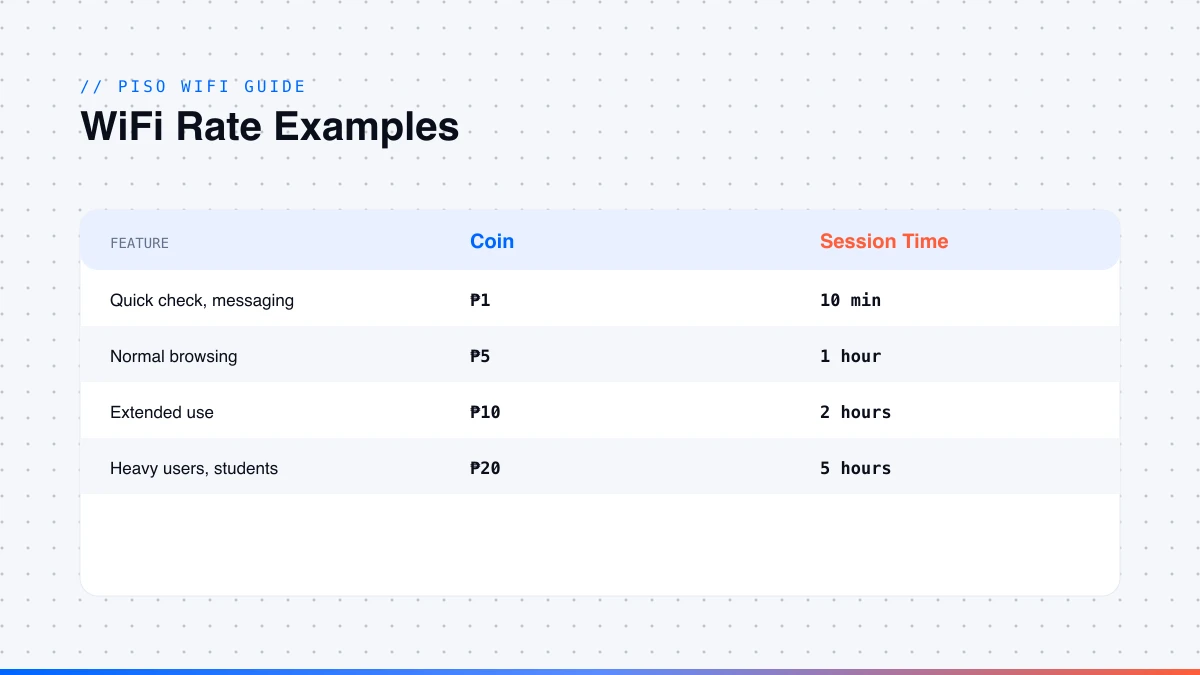
WiFi rates are the coin-to-time mapping for your machine. One peso buys ten minutes; five pesos buys an hour, depending on the rates you set.
- Log in to
10.0.0.1/admin - Go to Menu, then Rates, then WiFi Rates
- Click New Rate
- Enter the coin amount and the session time or data limit
- Set an optional download and upload speed limit for that specific rate tier
- Click Save, and the new rate goes live immediately
Rate examples used by operators in 2026:
| Coin Amount | Session Time | Common Use |
|---|---|---|
₱1 | 10 minutes | Quick check, messaging |
₱5 | 1 hour | Normal browsing |
₱10 | 2 hours | Extended use |
₱20 | 5 hours | Heavy users, students |
You can run multiple rates at the same time. The portal shows all active rates when the customer inserts coins, and the system credits the matching amount automatically.
PisoFi Voucher Code: Setting Up WiPass
WiPass is the PisoFi voucher code system. Instead of coins, customers use a printed code or a code you share with them directly. Useful for regular customers, school canteens, and any situation where coins are inconvenient.
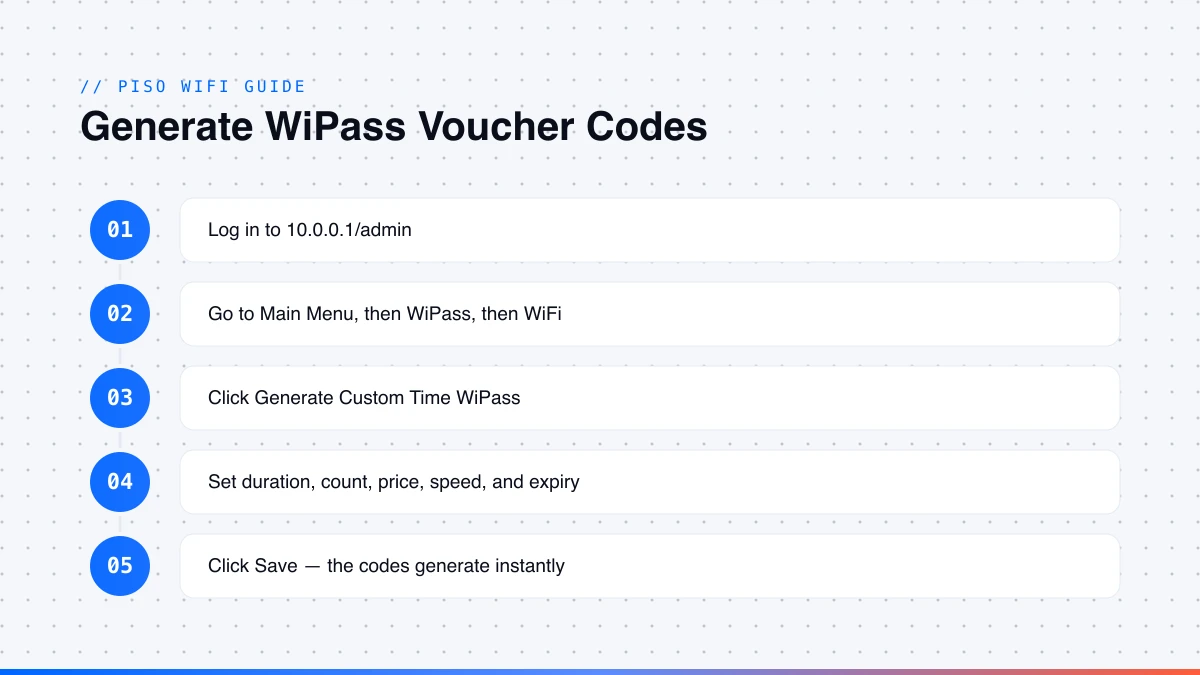
How to generate WiPass voucher codes:
- Log in to
10.0.0.1/admin - Go to Main Menu, then WiPass, then WiFi
- Click Generate Custom Time WiPass
- Fill in the duration, number of codes, price per code, download and upload speed limit, maximum devices per code, and expiration date
- Click Save, and the voucher codes generate instantly
Optional toggles you can turn on per voucher batch:
- Allow session pause
- Allow WiPass-to-time credit conversion
- Allow WiFi sharing from that session
Print them out or message them directly to your customers. If you need to cancel a batch, you can delete unused voucher codes from the same WiPass menu.
PisoFi Remote Management
There is no dedicated PisoFi app in the app stores. Remote management runs through two tools: NGrok for tunnel access and the web dashboard.
How to set up remote access:
- Create a free account at Ngrok
- Follow the setup instructions to link your NGrok account to your PisoFi vendo
- Each vendo needs its own NGrok account; one account does not cover multiple machines
- Log in to the web dashboard using your PisoFi email and password
- From that dashboard, you can check active sessions, view sales, and adjust settings from any phone or computer
Other built-in tools in the admin panel:
- Patch Manager pulls and installs quick bug fixes without you needing to reflash the SD card
- System Verifier runs a check on the integrity of your PisoFi installation
- Insert Coin Logs — a timestamped record of every coin inserted, visible under Activity in the admin panel
Bandwidth and Speed Management
If one user is pulling down files and dragging the whole network down, bandwidth limits fix it. PisoFi calculates speed allocation based only on actively connected users, so the numbers update in real time as people join or leave.
Steps to set bandwidth limits:
- Go to Menu, then Settings, then WiFi
- Enter your Minimum and Maximum Download and Upload limits in kbps
- Click Save
Speed guide for different use cases:
| Speed Setting | Best Fit |
|---|---|
| 512 kbps | Messaging, basic browsing |
| 1,000 to 2,000 kbps | Social media, standard video |
| 3,000 to 5,000 kbps | YouTube, video calls |
| 5,000 kbps and above | HD streaming, online gaming |
You can also set speed limits per WiPass batch or per WiFi rate. A ₱10 rate can offer faster speeds than a ₱1 rate, giving customers a reason to spend more. The anti-tethering feature blocks customers from sharing their session as a mobile hotspot, so one paid connection stays as one connection.
PisoFi Vendo Features Beyond WiFi
Most operators only use the WiFi function. The PisoFi vendo supports several other services running from the same machine.
- eLoading station — customers insert coins and buy prepaid mobile load directly from the vendo. This runs on the coins.ph API and is available in the Philippines only. If eLoad stops crediting, check the coins.ph API status before opening your machine.
- Desktop credits (Piso Net mode) — this is computer shop mode. Install the PisoFi PC client app on each desktop in your shop, and the vendo manages session timers for each computer the same way it manages WiFi sessions. Requires a separate desktop credit license at
₱300per machine. - Sub vendo and multi-coinslot — one main machine can run multiple sub vendos under it. Each sub vendo gets its own rates and portal settings. Good for locations with multiple rooms, multiple floors, or separate areas where you want different pricing. The system uses VLAN configuration to keep them separated.
- Coin-operated phone charging — customers pay coins to charge their phones. No extra hardware is needed beyond what you already have. It is just an additional service to turn on inside the admin panel.
- Bill acceptor support — adds paper bill acceptance alongside coins. Optional, but useful in locations where customers rarely carry exact change.
- Portal customisation — change the logo, colours, and layout of the customer-facing portal page. Basic visual changes need no coding at all. If you want something more specific, basic CSS knowledge is enough to do advanced edits.
- Free session setup for promotions or testing — Admin Portal, then Rates, then Free Internet. Set a time duration and save. Customers get internet access without inserting any coins for that session type.
Common PisoFi Problems and Fixes
| Problem | Most Likely Cause | Fix |
|---|---|---|
10.0.0.1/admin will not open | The device is not on the PisoFi network | Connect to “PisoFi” WiFi first, then load the URL |
| Ghost credits with no coins inserted | Coin slot grounding issue | Make sure the coin slot and Raspberry Pi share a common ground wire |
| SD card corrupts frequently | Cheap or failing SD card | Swap to a SanDisk Ultra; also check all cable and board connections |
| eLoading does not credit | Coins.ph API is down | Check the coins.ph API status page; it usually resolves on its own |
| The internet drops every 24 hours | Modem NAT or firewall issue, common on B525 and B938 modems | Schedule IPTABLES -F in the admin panel |
| Admin password is forgotten | N/A | Recover through the Raspberry Pi terminal |
| Portal buttons do not respond | Browser cache or outdated browser | Clear the cache or open the portal in Chrome |
| Coin inserts but does not register | NodeMCU firmware or coin acceptor sensitivity | Check the firmware version and adjust the coin acceptor sensitivity settings |
Sales Reports and Tracking Income
The admin dashboard records every transaction automatically. No manual logging needed.
What you can see inside the dashboard:
- Live view of active sessions and currently connected devices
- Daily and monthly sales totals
- Sales broken down by type: coins, WiPass, eLoad, desktop credits
- Full Insert Coin Logs with timestamps
Daily income ranges reported by operators in 2026:
| Location Type | Average Daily Earnings |
|---|---|
| Quiet residential area | ₱200 to ₱300 |
| Near a school or waiting area | ₱400 to ₱500 |
| Jeepney terminal or public market | ₱700 to ₱1,000 or more |
A complete starter kit — Raspberry Pi 4B, coin slot, router, and license — costs roughly ₱6,000 to ₱9,000, depending on where you buy the hardware. At a decent location, operators typically recover that cost in one to two months. After that, the main running costs are your ISP subscription and electricity.
Check your daily reports regularly. Peak hour patterns tell you whether your pricing is right and whether the location is worth keeping or moving.
Frequently Asked Questions
What is the default PisoFi admin password?
The default username is administrator, and the default password is admin12345. Change both on your first login.
What is the PisoFi admin URL?
The customer portal runs at http://10.0.0.1. The admin portal is at http://10.0.0.1/admin.
How much does a PisoFi license cost?
The main vendo license is ₱1,000. Sub vendo licenses are ₱300 each. Desktop credits for Piso Net mode are also ₱300 per machine.
Is PisoFi an online or offline system?
PisoFi operates offline. Your vendo machine runs without a live internet connection. The only online step is license validation, which happens during registration and not during normal operation.
What is a WiPass voucher code?
WiPass is the PisoFi voucher code system. You generate batches of prepaid codes in the admin panel under WiPass, then WiFi. Customers enter the code at the portal to get a session without inserting coins.
Does PisoFi work on Raspberry Pi 3 or earlier models?
The current PisoFi OS images are built for Raspberry Pi 4B. Older boards are not officially supported. Check the official PisoFi website for any updates on compatibility.
How do I create free WiFi sessions for customers?
Go to Admin Portal, then Rates, then Free Internet. Set the session duration and save. Customers can connect and go online without paying for that session type.
What do I do if my SD card keeps corrupting?
Replace it with a SanDisk Ultra MicroSD card. Also check your hardware connections, especially if you are using a custom board. Loose connections and poor board design are a common cause of repeated SD card failure.
About the author
Piso WiFi Guide Team
The Piso WiFi Guide Team documents how the 10.0.0.1 portal and admin panel behave across LPB, AdoPiSoft, JuanFi, PisoFi and other firmware, for both users and operators.